Before starting ANY work , lets get you up to speed with the enviroment and what you will need …
- Some sort of linux device with at least 32Gb storage, that could be a : Spare laptop , Raspberry Pi , a PC etc…
Info
- for the sake of this guide we will be using my main computer running on CachyOS with the 6.19… kernel but you dont have to replicate my setup
- This guide requires you have basic knowledge of the linux terminal
Warning
I Throw around the word shofel , and i do mean the shofel version SPECIFICALLY in devsparx repo (using the improvements brach for now) i show later on how to clone it , if anything should change i will try my best to update this guide as fast as possible , but do note our build of shofel will be undergoing some updates!
WARNING
Please do inform yourself
we are NOT liable for any damage caused to your device if you proceed with this guide , if you are not sure remotely on what youre doing i recommend either wait for the easier installation method , or find someone on the discord to guide you!!! (they arent liable for any damage either)
- A micro usb cable ==that you know is reliable==
- Like 4-5 Hours
- A Jibo (THAT IS SETUP TO YOUR NETWORK, AND YOU KNOW ITS IP)
- An the mindset of (everything will be fine!)
DANGER
Part 0 | Note your jibos IP Down
Make sure you have your jibos IP adress , so you wont have to redo 4 hours of flashing just because you forgot your ip
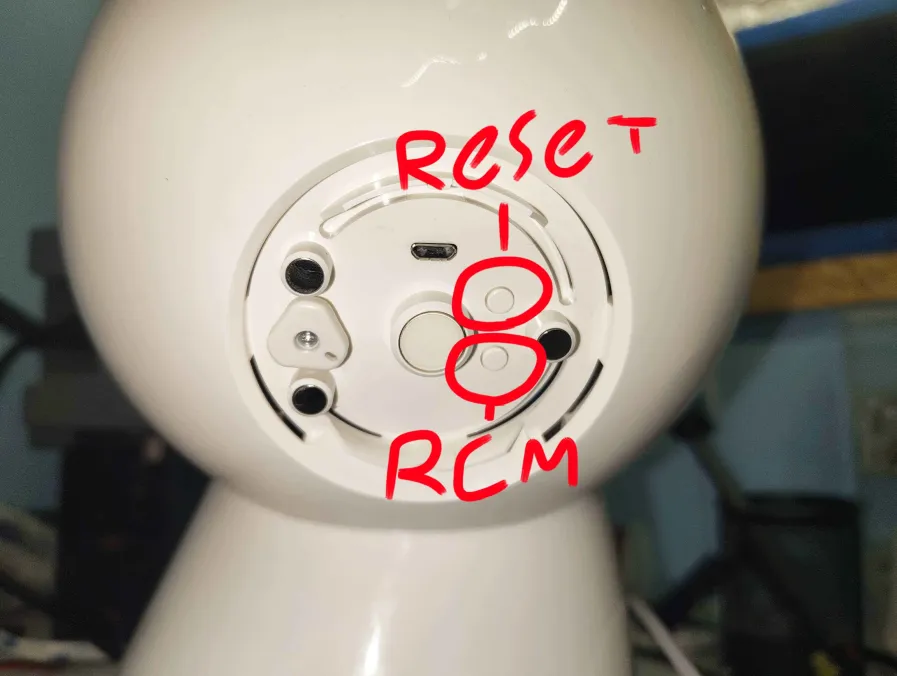
Part 1 | Connecting your jibo
So first , go ahead and plug jibo in to your host device that you are going to dump the firmware into using your usb cable
Hold the RCM button and press the reset button (or the power button if yours is off), and you should see a red light at his face but he wont boot normally
in the terminal were gonna execute lsusb to check for NVIDIA Corp. APX
kevin lsusb
Bus 001 Device 001: ID 1d6b:0002 Linux Foundation 2.0 root hub
Bus 001 Device 002: ID 1532:023f Uhhh no
Bus 001 Device 003: ID 0a12:0001 Ltd Bluetooth Dongle (HCI mode why tho)
Bus 001 Device 004: ID 08bb:2902 cant see me :)
Bus 001 Device 005: ID 1bcf:08b8 nope not me, its the guy below
Bus 001 Device 007: ID 0955:7740 NVIDIA Corp. APX <<<<<< LOOK FOR THIS ENTRY!!!!
Bus 002 Device 001: ID 1d6b:0003 Linux Foundation 3.0 root hub
Bus 003 Device 001: ID 1d6b:0002 Linux Foundation 2.0 root hub
Bus 003 Device 002: ID 0644:800f TEAC Corp. US-144 yes i use a 144 deal with it
Bus 004 Device 001: ID 1d6b:0003 Linux Foundation 3.0 root hub
Bus 004 Device 002: ID 0951:1666 Kingston wanna be drive
kevin Part 2 | Now before building shofel , get your packages ready
#for cachy / Arch users:
	sudo pacman -S --needed base-devel libusb git python python-pip

#for Ubuntu / debian users:
	sudo apt update
	sudo apt install build-essential libusb-1.0-0-dev git python3 python3-pip

#for fedora its whatever that is (i chatgpt'd it)
	sudo dnf groupinstall "Development Tools"
	sudo dnf install libusb1-devel python3-pip
Now time to clone & build shofel!
change to your home directory and use git to clone the branch and then use make to build it!
	cd ~

	git clone -b improvements/IncreasedUSBReadWriteSpeed https://github.com/devsparx/ShofEL2-for-T124.git

	cd ShofEL2-for-T124/

	make
# if it exits with error code 1 dont be alarmed , if you have a shofel executable in your directory , it compiled fine :)
Part 3 | Dumping your jibo!
Now , to get that full image (roughly about 15Gb)
we will run our newly build shofel using the EMMC_READ function , starting from 0 0x0 to 30480896 0x1D60000
sudo ./shofel2_t124 EMMC_READ 0x0 0x1D60000 full_jibo_dump.binthis may crash due to that im not sure how large exactly each jibos storage is (they should be the same from what i have seen in the community)
But if it crashes like 98.9% or 99.9% in then you have most of the image cloned so you should be good (we can repair it later , or you might not need to since the last partition is basically empty space!)
Info
Techically you dont need a full dump , BUT! I havent confirmed enough yet that all jibos have the same stuff stored in the same sectors , but its good to to have a back up to calculate your own sectors and to most importantly , read below :
WARNING
Make sure you make a backup of the filesystem … this is basically YOUR jibo , and it also contains YOUR jibos calibration data that might not be able to get restored by someone else… so keep a backup of the
.binin case of an emergency
Part 4 | Modifying the /var partition
Now that you have your image .bin ready and backed up its time to edit the /var partition!, thats Partition 5 at around 500mb
we can use fdisk to list the partitions in our bin
fdisk -l jibo_full_dump.bin`
kevin fdisk -l jibo_full_dump.bin
GPT PMBR size mismatch (30777343 != 30777341) will be corrected by write.
The backup GPT table is corrupt, but the primary appears OK, so that will be used.
The backup GPT table is not on the end of the device.
Disk jibo_full_dump.bin: 14,68 GiB, 15757999104 bytes, 30777342 sectors
Units: sectors of 1 * 512 = 512 bytes
Sector size (logical/physical): 512 bytes / 512 bytes
I/O size (minimum/optimal): 512 bytes / 512 bytes
Disklabel type: gpt
Disk identifier: 00042021-0408-4601-9DCC-A8C51255994F
Device Start End Sectors Size Type
jibo_full_dump.bin1 34 2048033 2048000 1000M Microsoft basic data
jibo_full_dump.bin2 2048034 4096033 2048000 1000M Microsoft basic data
jibo_full_dump.bin3 4096034 4198433 102400 50M Microsoft basic data
jibo_full_dump.bin4 4198434 8294433 4096000 2G Microsoft basic data
jibo_full_dump.bin5 8294434 9318433 1024000 500M Mic<<< This is the one!
jibo_full_dump.bin6 9318434 30777310 21458877 10,2G Microsoft basic data
kevin
now lets chop off the partition…
Look for the line ending in p5 or labeled as the 5th partition. You need two numbers from that line: Start and End
My Numbers:
- Start:
8294434- End:
9318433
To tell the computer exactly how much data to “chop off,” we need the total count of sectors
The formula is:
My Math:
Write your result down,this is your Count. We will now extract the Partition
We use dd (Disk Destroyer… but here, it’s the Disk Dumb joke… i couldnt think of something funny).
skip = Your Start sector.
count = Your calculated Count.
dd if=jibo_full_dump.bin of=var_partition.bin skip=8294434 count=1024000Part 4.2 | Mounting as a loop device
Now lets make a “loop” device and mount the var_partition.bin to it!
mkdir jibo_var
sudo mount -o loop var_partition.bin jibo_var/
you should see it appear as a mounted disk drive on your system!, now you have to navigate to jibo_var/jibo/mode.json
Open it with any text editor (like vim or vscode or notepad i dont care)
Find the line: "mode": "normal" (its legit the only line in there)
Change it to: "mode": "int-developer"
Save the file and exit
IMPORTANT
Unmount the partition to save the changes to the
.binfile!!!!
Now mode int-developer basically disables everything the robot runs (including firewall , so you can just ssh into it .. maybe in later guides you might be informed to change this value to something else , but currently its the simplest & easiest way to get root shell in the robot , and from there since you have root you can do everything you could by manually rewriting the entire dump)
Anyway you are free to mount the rest of the fs partitions to parouse the file system or if you want live editing , i will make a guide on how to connect to ftp… but if you have legit reached this point you really should know by now how to setup ftp yourself :|
sudo umount jibo_varPart 5 | Writing our modified var partition to jibo!
We are ready to put the modified chunk back into the robot. To do this, we must convert your Start Sector from a normal number (Decimal) to a computer number (Hexadecimal) because thats what shofel requires at this point of time.
1. The Conversion
Take your Start Sector (mine was 8294434) and use an online converter or your Linux calculator to get the Hex value.
My Hex was 0x7E9022
here is a quick calculator site i found on the web, https://www.inchcalculator.com/decimal-to-hex-converter/
If you dont know hex you can validate your calculation by punching in my value and see if it returns the same hex as mine
2. The Flash
time to run the write command, this sends your modified /var partition directly to that specific starting point on Jibo’s memory.
	./shofel2_t124 EMMC_WRITE <Your HEX Sector> var_partition.bin

	#my version example
	#./shofel2_t124 EMMC_WRITE 0x7E9022 var_partition.bin
Part 6 | Almost there!
Actually who am i tricking , you typed the write command , it hopefully succeeded so why are we not done?
well its done but i like to do a check myself to make sure its done correctly, SO
were gonna read back that part of memory:
./shofel2_t124 EMMC_READ 0x7E9022 0xFA000 verify_var.binand were gonna compare their hashes If the two files are identical, the math was right.
md5sum var_partition.bin verify_var.bin**If the strings of letters/numbers match exactly WERE DONE!!!!
Go and unplug your jibo , and to be safe hold the power button until the red LED goes off then power him on , and wait for it to boot normally
what we expect is to not start his eye but show a big check mark on his display, if thats the case , go ssh to jibos IP
	ssh root@<jibos-ip>
	password: jibo
And Boom , you are IN!